Saturday, December 17, 2016

Merry Christmouse! Disney World Christmas Trip Post Day 2: Epcot and Disney Springs


Happy second day of our trip! Day two dawned with us quite satisfied. Our room at Pop Century this trip far exceeded our last experience. Last time, the front desk clerk put us in a room that was literally across the corner from the lobby, so very close and convenient, but that also meant it was loud and had lots of traffic. Plus it was a handicapped accessible room, which meant the bathroom didn't have a separate bathtub...just a tile floor and a shower curtain across part of the room, with a pocket door that had rusted and was hard to open and close. Every time we took a shower, we would flood the bathroom. Not fun. Anyway, this time our room was a normal room on a quiet corner, and the experience was  much better. Art of Animation is still our "home" resort, but Pop is definitely an acceptable alternative. 

Friday, December 16, 2016

Merry Christmouse! Disney World Christmas Trip Post Day 1: Magic Kingdom


On December 1st through the 6th Tom and I returned to our "home": the most magical place on earth. I know we seem to say this after every time we visit, but once again this really was the best trip we've had at the parks yet. It seems like every time we go, the experience only gets better and better. And the bar has always been set quite high, starting with our first trip in October of 2013.

Monday, November 28, 2016

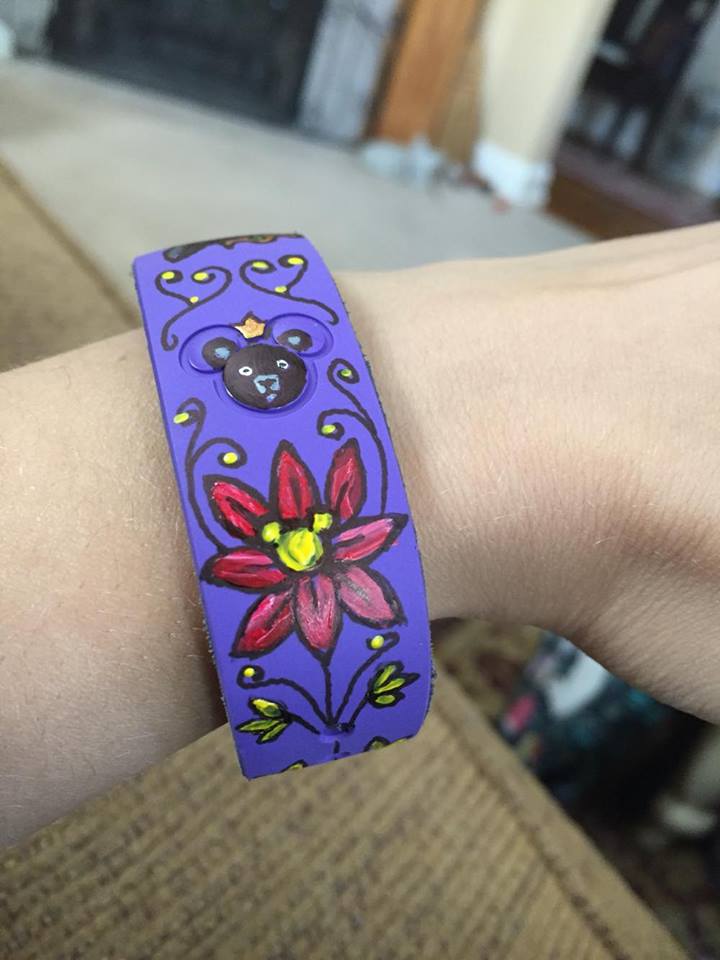
Magic Band Custom Painting - A DIY


Today I wanted to show you the method I use to decorate and customize my magic bands! 

Of course many of us have already heard that the magic bands are going to be undergoing a major change in the new year, converting to a new "puck" system with a center piece that is removable so that it can be worn in several different ways. But the primary way of wearing the magic band will still be...as a band, so even though the shape may soon differ, this painting method should still apply

Source

To create the designs on my bands, I downloaded a band template online, and sketched out both designs. A few things to note when creating your designs: don't forget about the Mickey head at the center of your band. There are many opportunities to get creative with how you decorate this part of the band, but it's also the area that gets the heaviest use and wear. Also, when you are designing the portion of your band with holes, don't forget that for most people, you will have overlap and not all the holes will show.


Once I was satisfied with the sketch for my bands, I used a fine-tip black Sharpie to draw out the design on the actual bands. This is a  nervewracking part of the process, but remember...if you mess up, you can cover it up with acrylic paint if the mess up is in the area you planned to paint. And even if you mess up in a spot you planned to leave blank, you can alter your design to paint in the background.


I then filled in my outline with acrylic paint and a tiny-bristle paintbrush. I generally tend to use cheap Apple Barrel-style craft acrylics for my magic bands, and they seem to work just fine.

After the acrylic paint dried thoroughly, I used DuraClear on each of them, brushing it on carefully with the bands clasped around a couple of spray paint cans that were about the size of our wrists. When I painted the gloss over the holes, some tended to seep down in. I used a straightened paper clip to keep the holes free of gloss.


I did three separate layers of the DuraClear, waiting two hours or so between coats for the previous coat to dry. But I'm an impatient person, so it might be better to wait even longer between coats if you can bring yourself to.

I find that the DuraClear works best out of all the varnishes I've tried for magic bands. You still may get a little bit of cracking by the end of your trip if your design requires you to coat your whole band with the varnish, but for most trips, after six days or so, there is still very minimal wear to the paint. 


Have fun decorating your magic bands! And here are a few extra tips:


The first time I decorated our magic bands by painting them, I dug out my husband and my bands from our first trip and do some testing on them. I am so so glad I did this, as simply reading from others that "acrylic paint sprayed with acrylic sealer works well" wasn't enough for me. I have three different kinds of acrylic paint in my crafting cabinet, and it was through doing these test bands that I discovered they all had different success rates: my large tubes of paint crack easily even with a top coat, while the smaller tubes of art paint and the craft acrylic paints held up much better.

I also discovered that Sharpie, when sprayed with Krylon Crystal Clear spray acrylic sealer, immediately runs and bleeds into a terrible mess. I can't imagine how distressed I would be if I had painted my bands and found that out the hard way. I also decided that the spray gave too uneven of coverage for my preference, although it should be said that I only did two layers of spray on my first test band. DuraClear does not smudge Sharpie, and makes the colors of the acrylics even more glossy and vibrant. You will be able to see brushstrokes in the finished design, so if you don't like that idea, Crystal Clear might give you smoother coverage (I don't know this for sure though).

And if you have smaller wrists like I do, try trimming off the excess black band rather than removing the entire thing. In other words, snip it right above the first hole on the black band area so that it appears to border the entire band, and still "frames" your art well. This is the first time I tried cutting off the excess band rather than removing the entire black frame, and I love how it looks...I wish I had done this every time!

I'll leave you with a few more examples of bands I've decorated for past trips!


Sunday, October 16, 2016

This is Halloween!


Tom and I have a touch of the Haunted Mansion in our Halloween decor this year. We finally got our Haunted Mansion haunted spirit portraits from our trip last October framed, and put it in the center of our Halloween mantel. They actually even startle me sometimes when I look at them.


Today, Tom and I ran out to see Miss Peregrine, then stopped by the Disney Store. Of course we came home with some new Disney Christmas ornaments, and another Baymax plush.

While we were at the theater, I got my picture with Moana. Looking forward to seeing this! It comes out right before our next trip to Disney, so hopefully they have some presence in the parks for it while we're there.


Sunday, September 18, 2016

New Logo and Shirt Design!

As you all know, I really love the Flower Crowns & Disney Bound Girl designed and drawn by my friend Rachel Oakes, and available on shirts.

But I also felt like I wanted a design that had the name of my site on it. Since I love the play on words of "Flower Crowns & Disney Bound" and felt like it was worthy of a shirt too. So I drew one up!


And it's now also available as a shirt!


I styled up my last FC&DB Girl shirt up as a tunic top with the design tall and long on the front, but I intentionally designed this one to (hopefully, won't know for sure till I buy one and confirm it) be a small enough printed area that you can wear the women's cut shirt tucked into a skirt and still see the whole design above the waist band, or wear a looser style belted and not cut off any of the design.

I can just see this shirt worn with a long floral maxi skirt sweeping around your ankles, like this chiffon number from Amazon.


And perhaps this adorable Minnie flower headband, in shades of purple instead?, from Etsy seller PixieDustPrettiess


Or of course the classic flower crown mouse ears.


As per TeePublic's usual practice with new shirt designs, this design will be available at a discounted rate for the next three days or so, and then the cost will go up, unless they are having one of their occasional $14 shirt sales. So grab one now, here!

Wednesday, September 14, 2016

Vacation Projects - Dress and Shirt

My vacation ends tonight, but we got my last project I wanted to do on vacation done....the dress I've been hoping to make with the Minnie Mouse floral fabric I bought a few months back. And I LOVE IT.


And we also finished altering my Flower Crowns & Disney Bound shirt (which btw is on sale again right now for $14)


Saturday, September 10, 2016

Lengthening a Beauty and the Beast Skirt

The grand sewing and crafting extravaganza continues!

Several months ago, I ordered this Beauty and the Beast skirt, in one size fits all, which is normally not an issue. And the waist band wasn't an issue: the length was. It was so short, I couldn't even excuse wearing it anywhere. When I did wear it, I'd have to either pair it with leggings or with a longer skirt, and honestly it was so short, both of those options looked a little silly.

Well, we fixed it!!


We added a band of, of all perfect things, a William Morris fabric I had on-hand thanks to my friend Briony, to the bottom, and covered the seam between with lace. I honestly adore how it looks now.


The Morris pattern looks like roses among thorns, so it's perfect not only color-wise, but theme-wise.

Once again, a before and after: