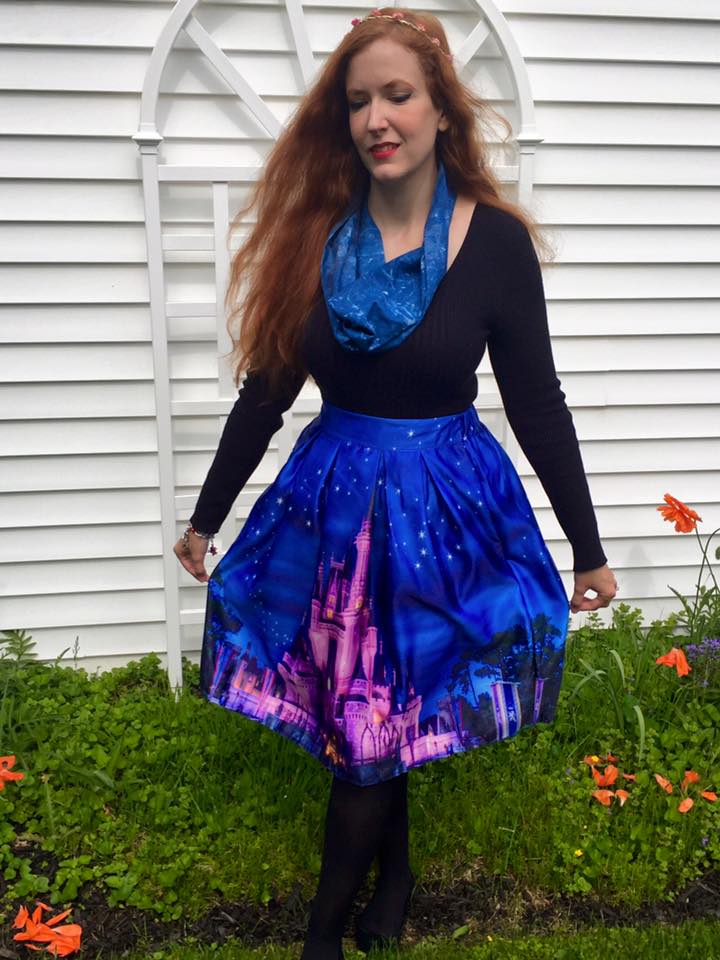
So as I announced yesterday, we are planning a trip back to Disney World this December! Which means...outfit planning, sewing, and ear making!
Making my Minnie Friendship Faire Flower Crown ears the other day was so fun, I decided to make a couple more the very next day.
First, a Cinderella (2015) themed pair of ears to wear with my Cinderella's castle skirt on our trip.
And I wasn't sure what ears would look good with my Flower Crowns & Disney Bound girl shirt (once I get it altered and jazzed up), but when I saw these black and white silk flowers, I knew they'd be perfect!
I also found this cute pair of leggings on Amazon that I think might look good with the shirt too.
And you may remember I bought a Haunted Mansion wallpaper dress off Amazon...
But I wanted to add some personality to it, so mom and I added some lace detail:
Still so much to do, but I'm excited about what I've done!
Friday, September 9, 2016
Thursday, September 8, 2016
A Trip Announcement!
Because once in a year isn't enough time to be at Disney World.
We will be going back December 1st through the 6th, and I already have all sorts of plans in the works. I'm on vacation until September 15th, and you better believe Disney trip outfit sewing is happening. And Mickey ear flower crown makings.
I have lots to share, and am excited to do so! Stay tuned!
Monday, September 5, 2016
DIY: Minnie Mouse Flower Crown from Mickey's Royal Friendship Faire
Today I wanted to share with you a how-to on the flower crown mouse ears I just made, inspired by Minnie's amazing new outfit in Mickey's Royal Friendship Faire.
Supplies Needed:
Hard headband. I picked these up in a five-pack from the Dollar Tree.
Black craft foam sheets. One sheet should be enough to do your ears if you like them about the size I do, but I always pick up an extra just in case.
Pencil and whatever object you want to trace to get your ear shape. This is the third pair of ears I've made using this glass tumbler from my kitchen, so at this point I know it's a size I'm going to like.
For this particular pair of ears, you'll also want some ribbon in the colors of your flowers. Minnie's original crown has a more plummy purple, and a more teal-ish blue, but my flowers work better with these colors, so that's what I bought. I picked these up from Walmart for something like $.39 or $49 per roll.
Flowers! Also a Dollar Tree score. To be honest, I find it easier to make flower crown mouse ears when I use cheaper flowers. They're easier to pull off their stems, and "flatten" a bit more easily too to conform to the headband shape when I need them to. I took a photo of Minnie's headgear to the store so I could match the flowers as best I could.
Also needed, scissors, and a hot glue gun. I also recommend using a Quaker Oats container to actually work on when you're creating your ears. Try not to glue your ears to the container, but even if you do, the paper should tear off and you can clean up later.
(Side note: These containers also make magnificent Minnie ears storage holders)
Lay your traced object on the craft foam and create a shape similar to this...two circles of identical sizes, connected by a small strip. Cut out the shape including the center strip.
Sandwich the two circles around the headband, hot glue in the center and along the strip. Make sure you know where you want the placement of your ears before you glue them in place. For instance, I prefer smaller ears, and wider placement instead of right on the top of my head (because I have a long face shape, and don't need any more height added)
Place your ears on the container and use your photo reference to start gluing your flowers to the headband and ears. Important note: When at all possible, try to cut off any remaining "stem" on your flowers as you can. This will make your headband more comfortable and keep plastic pieces from jabbing into your head all day when you wear them. Not fun.
For the ribbons, I cut each color to the same length, layered them in the same order on each side, and then hot glued the living daylights out of them. I covered this hot glue mess with more flowers.
And you're done! One great thing about flower crown mouse ears is that if you have any hot glue or rough edges showing, you can add more greenery from your flowers, or a little flower piece, or whatever.
Now to wear them to Disney!
Hard headband. I picked these up in a five-pack from the Dollar Tree.
Black craft foam sheets. One sheet should be enough to do your ears if you like them about the size I do, but I always pick up an extra just in case.
Pencil and whatever object you want to trace to get your ear shape. This is the third pair of ears I've made using this glass tumbler from my kitchen, so at this point I know it's a size I'm going to like.
For this particular pair of ears, you'll also want some ribbon in the colors of your flowers. Minnie's original crown has a more plummy purple, and a more teal-ish blue, but my flowers work better with these colors, so that's what I bought. I picked these up from Walmart for something like $.39 or $49 per roll.
Flowers! Also a Dollar Tree score. To be honest, I find it easier to make flower crown mouse ears when I use cheaper flowers. They're easier to pull off their stems, and "flatten" a bit more easily too to conform to the headband shape when I need them to. I took a photo of Minnie's headgear to the store so I could match the flowers as best I could.
Also needed, scissors, and a hot glue gun. I also recommend using a Quaker Oats container to actually work on when you're creating your ears. Try not to glue your ears to the container, but even if you do, the paper should tear off and you can clean up later.
(Side note: These containers also make magnificent Minnie ears storage holders)
Lay your traced object on the craft foam and create a shape similar to this...two circles of identical sizes, connected by a small strip. Cut out the shape including the center strip.
Sandwich the two circles around the headband, hot glue in the center and along the strip. Make sure you know where you want the placement of your ears before you glue them in place. For instance, I prefer smaller ears, and wider placement instead of right on the top of my head (because I have a long face shape, and don't need any more height added)
Place your ears on the container and use your photo reference to start gluing your flowers to the headband and ears. Important note: When at all possible, try to cut off any remaining "stem" on your flowers as you can. This will make your headband more comfortable and keep plastic pieces from jabbing into your head all day when you wear them. Not fun.
For the ribbons, I cut each color to the same length, layered them in the same order on each side, and then hot glued the living daylights out of them. I covered this hot glue mess with more flowers.
And you're done! One great thing about flower crown mouse ears is that if you have any hot glue or rough edges showing, you can add more greenery from your flowers, or a little flower piece, or whatever.
Now to wear them to Disney!
Saturday, September 3, 2016
Flowers for Minnie Ears!
I bought my flowers today to make my Minnie Royal Friendship Faire flower crown ears! I hope to make them early next week!
Sunday, August 28, 2016
Saturday, August 27, 2016
New Princess Toile - Couldn't Resist
I couldn't help it. Even though when I'm on vacation in a week or so, I have many Disney fashion sewing projects to already do (sewing my Minnie floral maxi dress, altering my Flower Crowns & Disney Bound t-shirt, adding a strip of fabric for length to my Beauty and the Beast skirt, adding lace accents to my Haunted Mansion dress) I still had to buy this fabric when I saw it at JoAnns today.
And a silly picture of me holding it around my waist like a sarong. I'm thinking a knee-length full circle skirt perhaps? It's hard to tell in the first two pictures, but the texture is like a satin, which surprised me, since I assumed this fabric was only available in a quilter's cotton type fabric. I got all the store had left, which was 1 1/2 yards. Looks like I have no shortage of Disney projects coming up!
Wednesday, August 24, 2016
Help!
![]() |
| Source |
Help! I'm suffering from TMONED!
If you don't know, that stands for "Too Many Outfits, Not Enough Disney!"
In other words, I now officially have more fun themed outfits to wear to the Disney parks than I have days scheduled to actually be at Disney! How do I possibly pick?
What's a Disney addict to do??
Subscribe to:
Posts (Atom)